
An Electrician's Walk-Through
Ironing Out The Details
If you were wondering - what if the owner wants a special recessed light fixture, or two light fixtures at the front door instead or the one I specified? At this point in time, the reason for the walk-through for the electrical work becomes crystal clear, and that is to give the customer, or homeowner, an opportunity to fine-tune the various elements in their new home, item by item. Just as you would have control of the paint colors of the various rooms, walls and trim paint for example, the plumbing fixtures in the bath and kitchen, etc., likewise you do have control of the electrical elements. If you are building a custom home, or even buying so-called spec house (being built on the speculation that it can be sold) you may be able to catch a builder with a house in-the-works such that you can have control over some of these selections.
When you think about it, is the telephone in your present home in a good location, or would it work better if it were somewhere else? How about the cable tv outlet, is it in a good spot, or would it be much more convenient in a different area? Maybe the phone location in a home isn’t as important these days as it once was, but nonetheless there are considerations for that even now; with cordless and cellular phones. In this day and age, all telephones need power sources in the home for a cordless or cellular telephone, for recharging or for powering an answering machine. As you can see, there are a lot of little decisions you can make at this stage of the game, that will help or hinder you for years to come.
The homeowner arrives and we begin by looking at the floor plan that I had marked out and discussing the job I had done making decisions for them (even though they weren’t factored-in with the design equation) basically finding out what were there likes and dislikes.
I ask them questions like:
1. Are they accustomed to their new spaces?
2. Have they taken time to locate or arrange their for example?
3. Do they have concepts regarding how they will utilize the various spaces?
4. Can I help them in presenting the variables on any given electrical item?
5. Do they have any previous knowledge about this process, or anything related to electrical, from a previous project?
6. Have they given thought to the various elements that we will be discussing for installation?

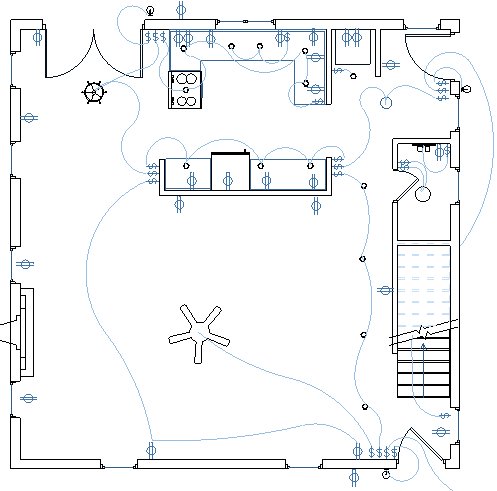
In this view of the 2nd floor, complete with smoke detectors, telephones and cable television outlets, you can see all the switching arrangement for the spaces. I have labeled the switches at each location, if not designated w/ 3 or 4, assume others are single-pole switches.
I mentioned that electricians have to be home traffic consultants to do their job well in the residential marketplace. Which way will you likely turn when you come in the back door into the kitchen, O.K., assuming you are not carrying groceries? Would you likely to cross the room to the hallway, to the bathroom, or the right to go up the stairs to the second floor? What about when you were carrying groceries, which way would you turn to off-load them, to the right to the pantry, or into the kitchen first? If you were coming down from the second floor where would you most likely head when you got to the bottom of the stairs? My vote? Probably the kitchen, to start the coffee. Which way do you open the basement door, away from the kitchen so you have to walk around the door, or toward the kitchen, where you will more likely be coming from. Electricians’ know these things, because it’s their job!
Once the customer shares their thoughts and I get a basic feel for the items that they may want to include for installation in regard to electrical items, I give them a basic course in National Electrical Code (NEC), or at least information relative to the residential installation at hand.
Wall Switches
I tell them that at every entry door to the house I need to have at least two switches, one for the exterior light on the porch for example, and one for the interior kitchen light. The idea here is that you would leave your house and turn the outdoor light on as you left, conversely turning off the kitchen light behind you as you leave the room. By NEC dictum this switching arrangement occurs every time you enter and exit a room, for example leaving the kitchen and going down the hallway to another part of the front door. As you left the kitchen you would turn the kitchen light off at one of the three switches that are at the start of the hallway. The second and third switches would be to turn on the light(s) of the room you were entering, in this case the back or the front hallway.
So, you have a switch inside your bedroom, and one in the hallway outside your room, for the hallway lighting for example. This arrangement is typical, in that it satisfies the lighted-way code issue by providing access to a switch to control the lights in the hallway with the hall switch, and have a switch inside the room to that now lighted-way. What if you don’t have a light in a bedroom you say? Well the NEC provides for that also by allowing us to switch a portion of a duplex receptacle, for example the lower half. Usually a lamp is plugged into the switched ‘half’ of the receptacle and the lamp itself is left ‘on’. Follow the lines from the bedroom switches, to the receptacles in each adjoining wall of the two bedrooms. In each of these bedrooms there are two receptacles switched by the door. I will go into more wiring detail about this in a How To” segment in later entries.
This switch ruling is actually enforced as a building code issue, as a lighted-way is a safe way, and adhered to in this case by the electrician, a typical crossover of National Building Code and National Electrical Code. So that covers the switching ‘have to’s’, but let me go on with a little more of this switching stuff, before I walk out and leave the kitchen light burning!
The Gamut On Switches
The Single Pole Switch
Ah, switches; there are several to choose from, starting with the Single Pole Switch. The Single Pole switch has two terminals and the toggle action of the switch closes and opens a circuit that it is controlling (turns on the light, turns off the light).
The 2-Pole Switch
The 2-Pole Switch is used in applications where it is necessary to break two poles or phases of power. These are used when a 240 volt circuit, like a water pump, or an electric heater, must be disconnected from its source of power. These are not found in your home as wall switches, but they may be used in your basement, or in your workshop. A 2-Pole switch, a term interchangeable with Double Pole switch, make and break two phases, and therefore has an ON and OFF written on the toggle handle; the switch should always be mounted so that you can read the words.
The 3-Way Switch
This name of this switch, a 3-Way, sort of suggests switches in three locations for the same light switch, but the expression is actually a misnomer. A 3-way switch allows the user to control a particular light fixture, or half-switched receptacle, from two locations, as in the switching configurations I mentioned, passing from one area to the other, throwing the light off behind you as you turn the lights on ahead of you. The 3-Way switch has three screw terminals, with one of these three terminal as a pivot point; the flipping action toggles between the other two terminals. The 3-Way switch has nothing written on the toggle handle, and can be mounted in any manner, since there is no top, no bottom, and no OFF position on a 3-Way switch
The 4-Way Switch
Not to add confusion, but there is also a 4-way switch, which by its name implies switching at a fourth location, but that is only half-true. Although you can use this 4-way switch as the fourth switch for a given light fixture, you can also use this switch as the third switch, the fourth and then the fifth switch, a sixth switch, etc., with one, two, or three 4-way switches wired in between the two 3-ways in the system.
The 4-Way Switch has four terminal screws, for the connection of four conductors, two from each cable assembly. The flipping action toggles the connection between two red conductors, one from each cable, with the connection of two black conductors. So sometimes the switch will be connecting red / red, black / black; other times black / red and black / red. The 4-Way switch does not have anything written on the toggle handle and can be mounted in any manner, since there is no top, no bottom, since there is no OFF position on a 4-Way switch.
You would also see this switching system in common stairways of multiple storied buildings, and mandatory for the lighting within such stairwells, whereby anyone entering the stairway from any level, can turn the lights on when they enter the space. So, that covers wall switches and NEC issues, are you still with me?

Duplex Receptacles
Good, let us now move on to another electrical element that must be installed in a concise and consistent manner, that is the convenience outlet, or duplex receptacle. These are the electrical units that will eliminate the need for extension cords, keeping your home free of hazards involving an overloaded and overheated extension cord. There are strict rules as to the minimum requirements for the installation of these power sources; but you can always add more than the NEC requires.
I just did hit on a major reason for the need for plenty of duplex receptacles, to eliminate the need for extension cords, both for the overheating hazard as mentioned, but further, considering the physical presence of extension cords, running under the rug; scary means necessary to getting power to that lamp, window air conditioner, fan, curling iron or hair dryer.. ...whatever! Extension cords are bad news and they shouldn’t be used to keep the electrician away. Because faulty extension cords are still the leading cause of house fires; the NEC has made a change recently about the safety of extension cords and what is now required to eliminate that fire hazard. Read more on “Arc Fault Protection” in future entries.
Receptacles Where?
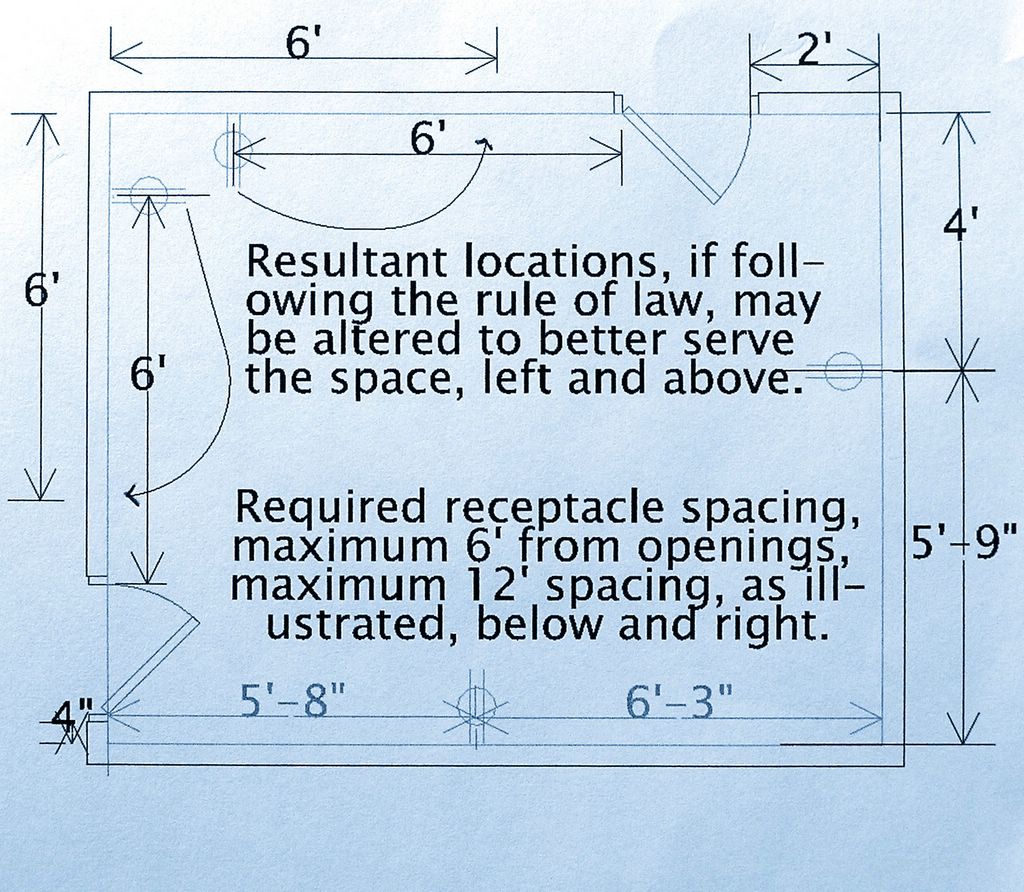
NEC reads that every wall space larger than 24" wide, or that short section of wall between two closet or bedroom doors, measuring 24" or more, requires a duplex receptacle.
Now suppose that there was a closet, or a bathroom door, adjacent to the entry door to the bedroom, and, if the width between the two doors was 24" or greater, there would be a NEC requirement for a duplex receptacle to cover that space. If the space was less than 24" wide, a receptacle would not be required. Now we come to the other side of the closet door, as the wall continues along, enclosing the room. Measuring from the further edge of that door to the first receptacle the distance must be no greater than six feet, measured along the wall surface; from that receptacle the spacing to the next receptacle must be no longer than 12 feet, and, again measured along the wall surface.
The receptacle spacing in the kitchen, bathroom, hallways and foyers differs slightly, as the various rooms are treated not dissimilarly, since they have specific uses, and specific requirements, and the NEC is tailored to address those inherent electrical power needs and the hazards they bring into being. We spoke earlier in the conversation about providing GFCI protection in kitchens, bathrooms, unfinished basements and outdoors. See our kitchen plan below.
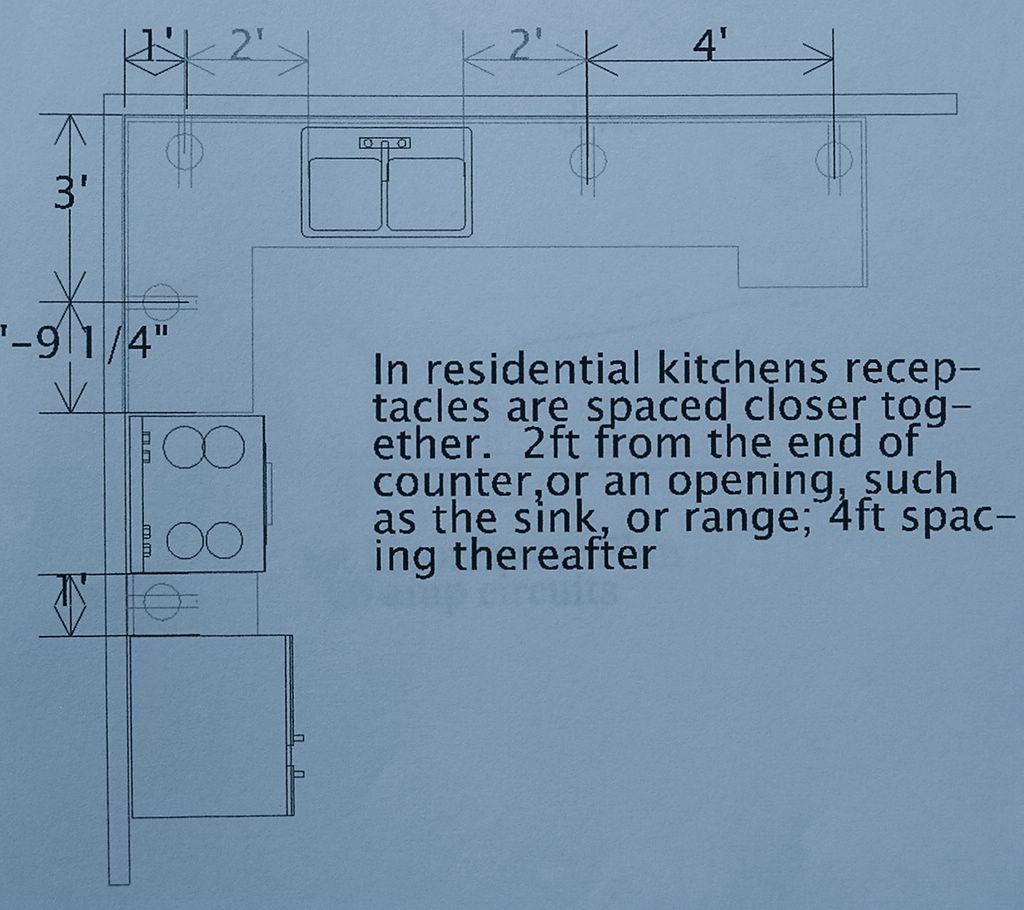
Notice the receptacles are spaced 2' from the sink edge, and 4' in between them; this is the code requirement for receptacles on kitchen counter tops. The reason is a pretty clear one, there are a lot of electrical appliances these days, and the lot of them come with only 2' cords, see the need? Also these days there is a new feature on kitchen countertops, and that is the so-called appliance garage, yes, appliance garage. These cabinets are brought down all the way to the counter top, and with a duplex receptacle or two inside them, the individual appliances can be used outside the garage, without unplugging them. The remaing counter top area must still be wired with duplex receptacles, as before, with the same stated distances. I include the following plan to demonstrate receptacle spacing on the kitchen counter top.
I will touch on the exterior receptacle requirements here and mention that in the receptacle count for the dwelling, by NEC rules I have to provide a weather-resistant duplex receptacle at the front and rear of any dwelling unit, and there must be one mounted at each grade level in the building. If there was a walkout room in your basement, which delivered you to a different grade on your property, you would be required to add a weather-resistant GFCI receptacle at that grade level. Also, the idea from the Code Making Panel, as to what hazardous situation you are trying to prevent, is the convenience of running an extension cord through the door or window and plugging into a receptacle that is not GFCI protected. This would leave the user in peril in regard to protection from electrocution.
Walk On
I always start walking through the house with a client by suggesting we start at the second floor, or the furthest reaches of the structure, and work our way out to daylight and the lower floors. By doing this I can often walk the person or persons through as if they were getting out of bed and beginning their day.
Being on the upper floors, I usually find a bedroom to begin the tour. For the homeowner it is usually best to know the spaces beforehand, the window placement, possible furniture layout like locating the bed wall, and where the dressers will be. The switch at the door can control a receptacle in the room, one conveniently located behind a dresser is usually the place for the lamp that will be activated by the switch, you choose. A Cable Television outlet can be mounted opposite the bed, and a telephone outlet can be located on a bedside table, with a telephone jack behind the bed.
I usually don’t recommend any light fixtures in the bedroom ceilings, since that was a practice that went out of favor years ago, but, although I don’t promote bedroom lighting, others do like them. A recessed over each headboard for reading, or sometimes swing-arm lamps are utilized, I recommend that the light fixtures be switched at the lamp, and not at the switch by the door. Overhead lighting for reading can also be a disaster, I should mention that you would get glare off the page that you wouldn’t be able to direct, making reading uncomfortable in bed, not to mention reflected light on your sleeping partner.
Closet Lights A Must
The two bedrooms in this view also feature closet lighting, restricted to fluorescent lighting strips, open lamp or housed within a plastic lens; open lamps of the incandescent type are no longer legal. The problem with the open lamp of yesteryear is the excessive heat created by the lamp; when considering the fire hazard of an over-filled closet, teeming with items, stacked high, touching the hot surface of the lamp. So it goes that the next thing you know, there is fire.
Ceiling Fans In Summer
Also in the bedrooms you will see ceiling, or paddle fans. Ceiling fans are used the world over, most especially in the warmer climate zones. Moving the air around, ever so lightly on a hot evening, cools the body down nicely, without air conditioning. Although in these Northern climes, when sitting around the woodstove, or fireplace, which is commonplace come Autumn, you wouldn't use the ceiling fan to recirculate the warm air, as most people assume. In fact, the moving air serves only to cool your body down, while evaporating moisture from your skin. The very perception of losing body heat in this way in Winter boggles the mind, but it's true! Keep in mind that a ceiling fan must be hung at a maximum height, usually 7'-6" above the finish floor from the lowest point of the fan blade in order to pass code. If the fan manufacturer says that you can hang their fan at a lower height, you may do so. Underwriters Laboratory (U.L.) sets the standard as the manufacturer's recommendations for use, always follow the guidelines that come with an electrical product. It is the law!
End Bedroom Befuddlment
In a bedroom I ask the client if they have a habit of reading before it’s “lights out”. If so, the swing arm lamps I mentioned earlier would be suggested now, and I would also give them a little idea that works for some people. It has to do with the switch at the door, controlling one or more of the outlets in the bedroom. If the answer is yes, they do read before retiring at night, I will suggest that we use the switch at the bedroom door to control the receptacle(s) behind the bed, switching only half of the device. The swing arm lamps can be plugged into these switched outlets, but what then? We have all had the problem, and that is what do you do every time you want to use the switch at the door to turn on your swing arm lamps, and the lamps are still turned off, as you left them the night before. I suggest to them that we install two 3-Way switches and a 4-Way switch in the room in stead of the single switch at the door, now you have three places to control these lamps, one at the door, one at each night stand. Leave the swing arm lamps in the “on” position and use the wall switches to control the lamps! Or, if there is only one reader in the house, you can put in two 3-Way switches, with one 3-Way switch behind the reader’s night table and one at the door! Now I have to know who sleeps on what side of the bed! Yikes!
Bathroom Solutions
Inside our bathroom, there is a small vanity cabinet, with a sink, a full fiberglass bathtub unit and a toilet. I generally recommend a switch, just inside the door, for a light source. The light source can be a ceiling light, either recessed or surface mount. Whatever is chosen, it should be placed near the center of the room, for general illumination, as shown. Another bathroom lighting option is that the required exhaust fan can also be combined with a light fixture, a unit called, not surprisingly, a fan/light! More on that below. In this house, the 2nd floor bathroom has a recessed light over the toilet area, this light is shown switched with the light portion of the fan/light unit, but it could warrant a separate switch.
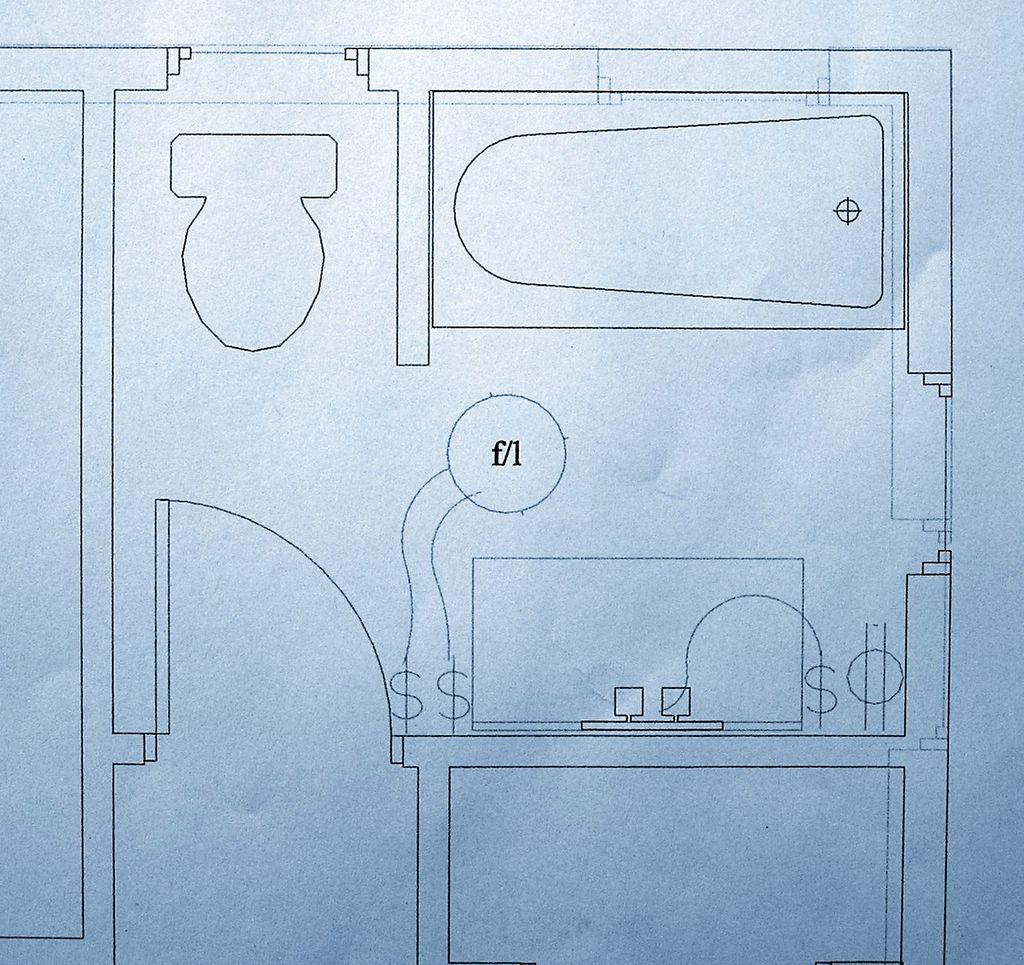
At the sink, or vanity, I suggest using sconce fixtures, usually two mounted at an average height, somewhere between 60" or 72", depending on personal preferences. The object of these additional light fixtures is to provide ample light at the vanity sink. Men will use the additional light for shaving, women for putting on makeup. A single fixture could be mounted above the mirror or medicine cabinet; you probably have seen multi-lamp varieties; some would use or suggest an overhead recessed or surface lighting scheme, but this arrangement would cause facial shadowing and, I think Martha Stewart would agree, that is not a Good Thing! In order to make an accurate decision as to the location of these sconce fixtures we leave a cable inside the wall cavity, to be pulled out of the wall later on, when the vanity sink, the vanity mirror or the medicine cabinet are installed, when we can pinpoint the location of the two fixtures. I will get into that wiring procedure in a future blog, with a hands-on rough wiring segment. As to the switch location for the vanity fixtures I always suggest we put the switch at the vanity location.
Bathroom Exhaust Fans A Must!
I tell the client that they must have an exhaust fan in every bathroom space, regardless of whether or not there is an operational window in the room. The first question from a customer is always, can we have a separate switch for the fan? The answer of course, is yes; there is only the need for the exhaust fan, even if it's on a separate switch. As far as I know there are no exhaust fan police to arrest you, or your child, for not utilizing it!
There are myriad choices in the fan, or fan/light market, all with different configurations of air movers, light sources; types, not to mention the ultra-quiet models. And, since a bath exhaust fan can sound much like the clatter of an approaching freight train, the whisper quiet models get the most consideration these days. I sometimes suggest a fan/light unit and mount it within the bathtub enclosure, where it can light an otherwise dark area and immediately exhaust the moist air from your hot shower.
In the quiet division, there are now available so-called remote located, multi-space ventilating fans, or single source, multi-station intake/exhaust fan systems. but, whatever moniker they carry, the concept is to remove the sound source as far from the ventilated space as possible, with a fan motor actually installed in your attic, or crawl space, the single fan can serve one or more bathrooms. The individual rooms are connected, with wye fittings and flexible duct hose, to ceiling intake vents and dampered exhaust caps on the exterior of the building. These fans are available in several sizes, with their uptake/output measured in Cubic Feet Per Minute (CFM), according to the size (cubic feet) of the room(s) being ventilated. No matter what the situation, there are building codes which must be followed that mention minimum air movement, this is expressed in air changes per hour. The object of the building code and the practicality of a system to exhaust odors and humidity is a simple one -more air movement - less mildew and mold. Clearly a health issue.
As shown, this 2nd floor bathroom gets a fan/light combination, and, getting back to the separate switch for the bath fan, yes, we can put in that separate switch, but, since the fan should be used when showering, it is utilized most effectively if turned on before you start your shower, and turned off fifteen minutes after you turn off the shower. I usually recommend a timer, a simple spring wind-up type. They fit in the box like a switch, you can set it for 10 - 15 - 20 minutes, towel off, and walk away! The unit shuts down for you in the desired time frame, keeping your room's air quality in the fresh and healthy zone. My clients with children breathe a sigh of relief when they hear this solution!
Required Ground Fault Receptacles
Then there is the bathroom receptacle, which must be accessible to the sink area, or vanity top. This receptacle must be a GFCI receptacle, and, if a new house, it be on a 120 volt 20 amp circuit, that said, the same individual 120 volt circuit can service all of the bath receptacles in the house, although your electrician might find this troublesome from an economical standpoint. If the budget allows, I suggest the use of multiple GFCI devices, protecting each location. This method is the most convenient for the end-user, since when the individual device trips, the reset button is easy to find. The GFCI is almost always ganged together with the vanity light switch, at least on my watch! Make sure you have plenty of “receptacles” into which to plug all of your bath appliances, electric toothbrush, hair dryer or curler, a night light?
Out in the hallway, but still on the second floor, we discuss the lighting possibilities for the upper hall area, and lighting in the stairs down to the first floor. If there is a hall closet, the ceiling light source can be located nearby. Locating the stairwell light fixture so it not only lights the steps, but does so without creating too many shadows.
Hallways and Corridors
In this plan of the 2nd floor hallway and the lighting locations; in this case the hall fixtures are recessed. There are also three duplex receptacles, only one is required by the NEC. In some cases these hallway outlets can serve as a power source for a lamp, perhaps on a small table. It makes sense to place the required duplex so that it could serve that purpose, by placing it where there is adequate space. Other receptacles in hallways can be utilized when vacuuming, or using some other household appliance. In some older residences, where there are no hall outlets, the outlets are often hidden behind furniture and not exactly accessible.
Now, as we are about to turn off the lights in the upper hall, you will see another switch that will light your way to the bottom of the stairs, flip it on the way by.
1st Floor Switching and Power Plan
The Foyer, Or Entry Hall
As you came down the stairs you would turn off the stairwell lighting with the 3-Way switch at the bottom of the stairs, next to the window. The switch for the lighting in the back hallway, is one of the two 3-Way switches is at the front door. Some would want a second switch at the bottom of the stairs, to control those recessed lights, but, the owner decided they didn’t mind the reach. I think it is fine the way it is, only an arms length away. The front entry, or foyer, is lit by the array of recessed lighting, heading to the back of the house and the kitchen. Chosen for these locations were 5" incandescent recessed fixtures. Corridor receptacles are practically non-existent, save the one at the base of the stairs, where there may be room there for a small table under the window.
In some homes, the front foyer is the centerpiece of the house, where guest are greeted. A suitably elegant fixture could be chosen for this space, to accentuate an architectural detail, or merely blend with its surroundings.
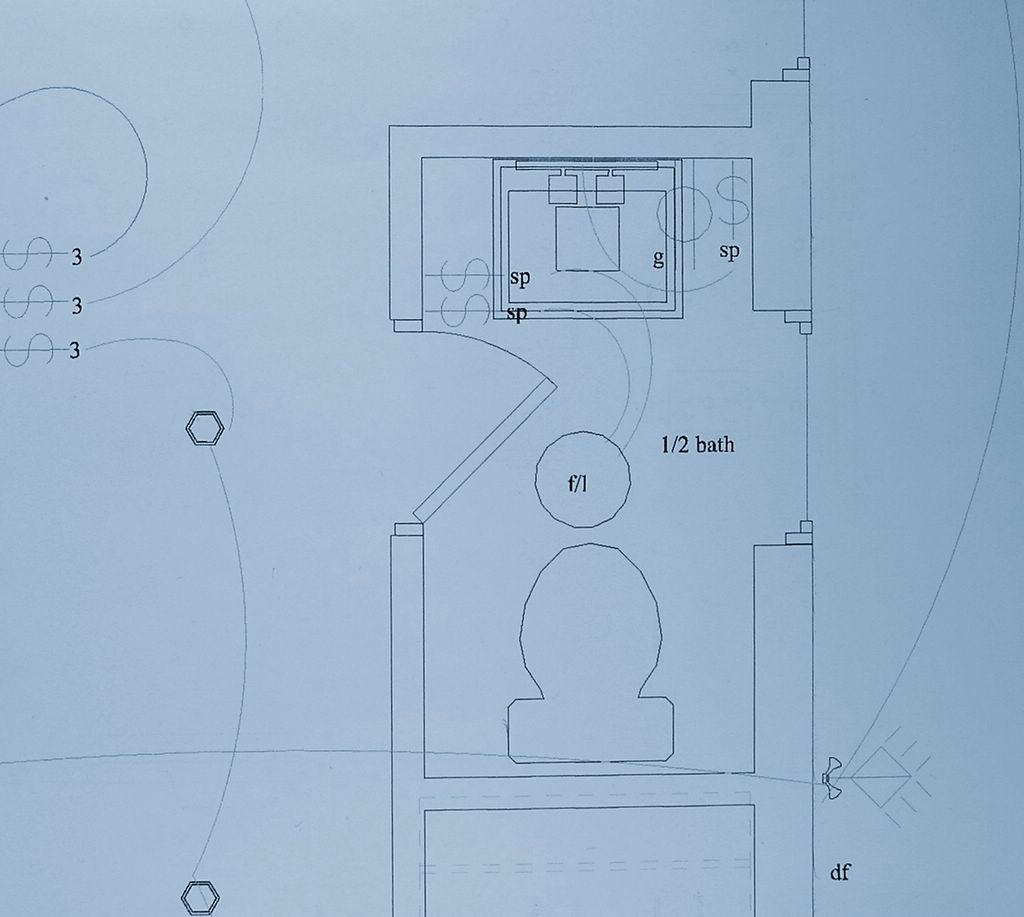
bloghouse 1/2 bath
The Half-Bath
Inside the bathroom are two switches at the door for the exhaust fan and the general illumination is provided by the same overhead location, as part of the fan light unit. There is the required GFCI receptacle, to the right of the sink (some items have been hidden for clarity) and a switch for the single fixture over the mirror, as this one is shown. I will try to talk them out of the single fixture, we’ll see.... I will instruct the guys to leave a cable in the wall cavity, as always, so that two fixtures can be mounted exactly where they belong, measured off the mirror or medicine cabinet, once they are hung..
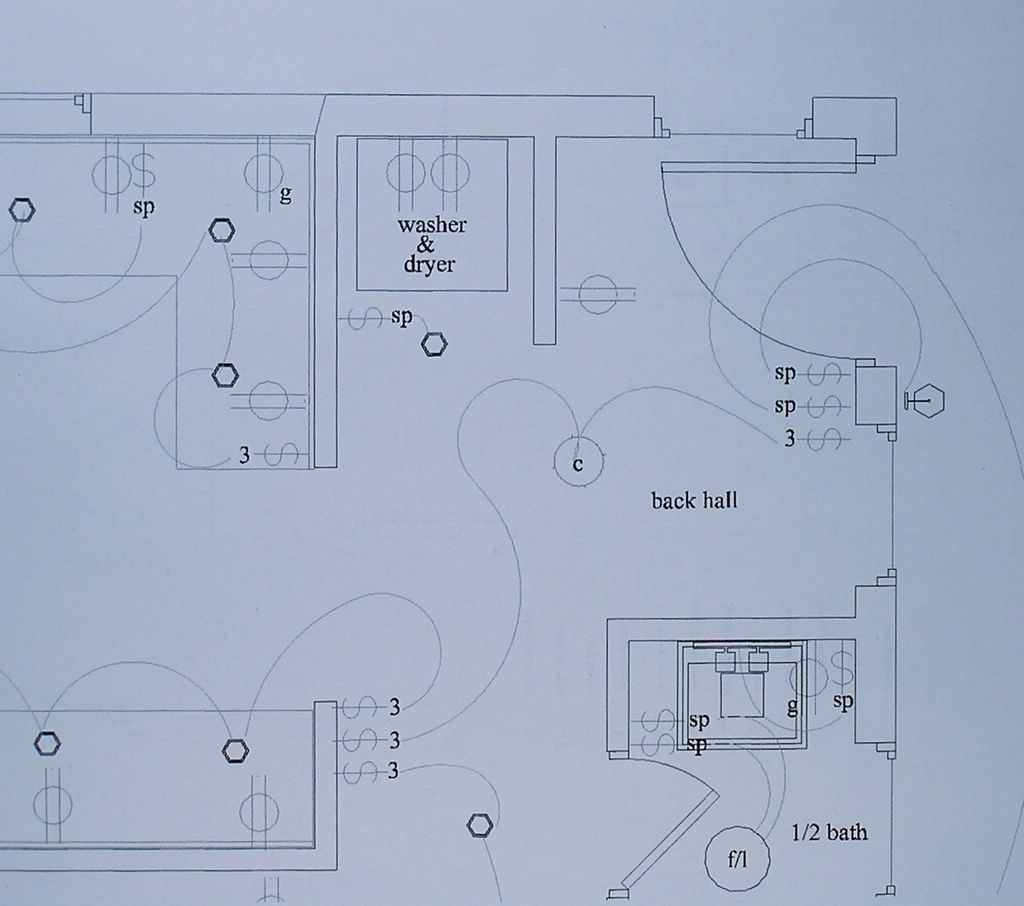
The Laundry
In the back hall, or laundry, the double duplex receptacle in the small coset is set in behind the washing machine and clothes dryer, a stack unit; two outlets for two appliances. If this were an electric clothes dryer, there would be a 30 amp / 240 volt circuit, just for the dryer, but in this case the clothes dryer is a gas appliance. The general area is lit by the ceiling light, but the owner wanted an extra fixture to light the area in front of the laundry. Notice the overhead fixture is on a set of 3-Way switches, between the hall three gang and the back door location.
Off the laundry is the back door, leading to the driveway. At the door there you can see three switches, one for the light mounted on the wall, that lights the back stoop. The second is a 3-Way switch, for the ceiling light in that hallway, as mentioned earlier. The third switch is the second 3-Way for the driveway flood (the first 3-Way is at the front door), that we moved to the forward corner of the house to light the drive better.
The Kitchen
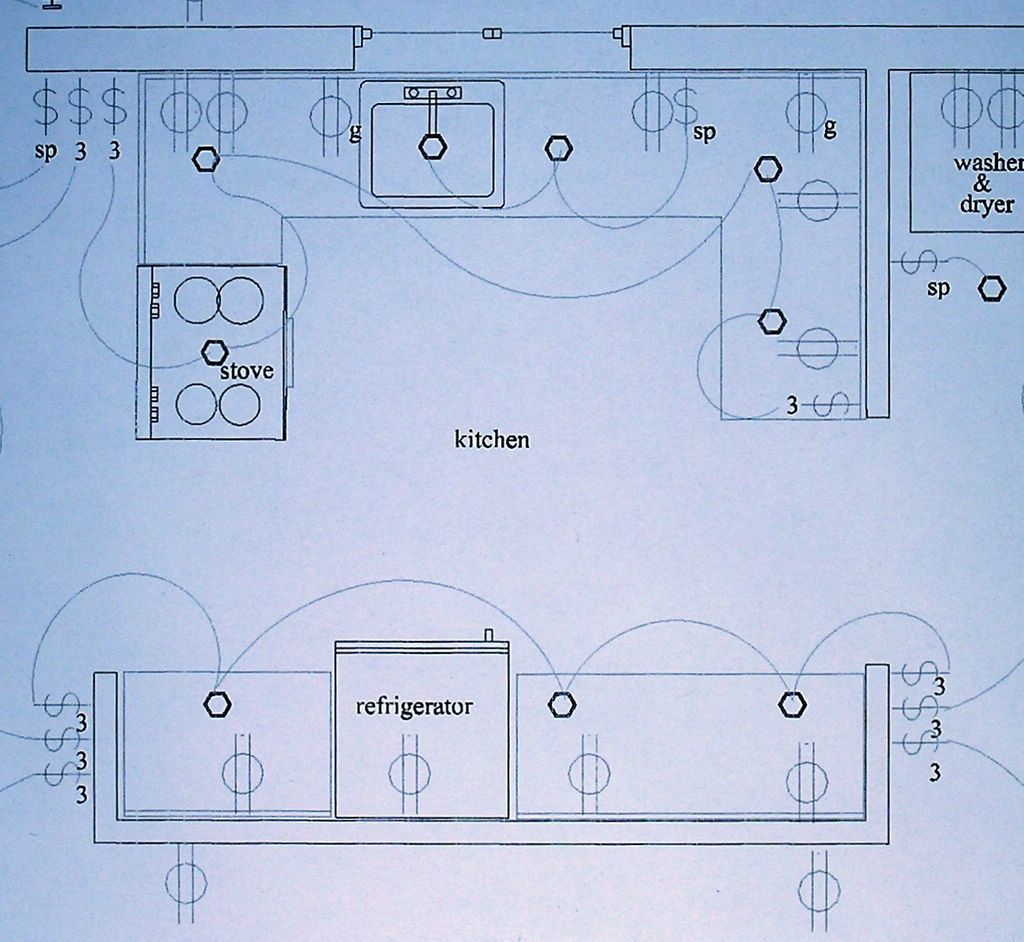
We did a small segment on receptacle placement in the kitchen earlier, and I don’t want to repeat myself, so... ..the kitchen plan shows the spacing of the counter receptacles, in-keeping with NEC mandates, trust me! The “g” by the duplex receptacles signifies that the receptacles serving the counter top have to be GFI protected.
Recessed Low-Voltage Lighting
Notice the lighting layout and the switching for it. This is an excellent way to show you the possibilities for switching the lighting in this kitchen space, and in this case it actually worked out as I had previously sketched it in. This was a big consideration for the owners, since they spend a lot of time preparing meals, they wanted a clean look without sacrificing quality. They chose low-voltage, halogen recessed overhead fixtures, with step baffle trims; an excellent choice for this application!
In this instance, each recessed low voltage fixture will have its own transformer built in, to drop the line voltage from 120 volts to 24 volts, for the 12 volt MR16 halogen lamps. This fixture is a little bit more expensive than the incandescent variety, but the added cost is worth it when considering the energy consumption of this fixture is only 1/3 the cost of the incandescent. Another plus is the advantage of a clean white halogen light source which will render all colors of the rainbow in their true hues, without distortion.
The recessed lights will be installed over the counter tops, and will be situated so as to light the overhead cabinets as well, without throwing shadows onto the workspace below. By holding the center of the fixture at nineteen or so inches from the cabinet wall, we can bulls eye the 12" of counter space between the cabinet front and the leading edge of the counter. This will ensure a shadow-free work space situation. Notice the switching that control these fixtures, with one set of 3-Ways controlling a group of fixtures along the sink counter, a second set of 3-ways to control the set of recessed lights on the other side of the kitchen. These two lighting scenarios enable the owners a lot of options in regard to indoor traffic patterns. The recessed light over the sink will be enabled from the switch to the right of the sink and next to it will be the switch for the under-cabinet lighting.
A garbage disposal is not to be installed on this house, but if there were one, I would recommend it be turned on by inserting the stopper in a certain way so as to complete a circuit to start the unit. This is an acceptable and safe way to use your disposal. If the garbage disposal needs a switch to operated it, I do recommend the switch for it be installed under the kitchen sink, at about knee level, just inside the cabinet door. Only the person in front of that door can actuate the grinder, only the person in front of that door with arms long enough to be inside the disposer itself with one hand, with the other on the activation switch (read: nobody) can get hurt.
Ambiance Under-Cabinet Lighting
I also convinced them to use my favorite brand of under-cabinet lighting! From Seagull Lighting, Ambiance under-cabinet lighting is a system I have been using since 1993, practically as soon as the products hit the market. Very adaptable, easy to install, with stunning results. When I go back to a client’s house to see them about additional work, or to check a problem, I am heaped upon with compliments about them! The ladies really love the pure white light of the halogen recessed and the Ambiance under-cabinet lights, with zenon lamps, especially the manner in which it showcases their beautiful cabinetry and counter tops. The under-cabinet lighting completes the package, for a brightly lit workplace that you need.
The Ambiance lighting system can also be adapted to use inside glass front cabinets, over cabinets, for accent, and all of these offering a low light source when used in conjunction with a lighting dimmer. For the homeowner and for the do it yourself electrician, a blow by blow “Ambiance” “How To” segment is coming soon.
The Dining Room
The dining room is the next room, just off the kitchen. Note the overhead lighting fixture with a switch at each entrance to the dining room, from the french door, and also from the living room. This is another wire that we leave inside the building finish, in this case between the ceiling joists, until later, when the furniture is in place and the fixture can be aligned with various other elements in the room, most especially the dining table itself. The wire is initially set in the ceiling in the approximate location, where maybe a foot or two of extra wire is left, encircling several bays in-between the joists. The wire is then found by cutting a hole for the electrical box where the fixture is to be set, with a little searching to find the cable.
Exterior Lighting Choices
At the french door, there is a switch for the back door light, mounted on the building at 6' or so above the threshold of the door. The owners decided that they wanted a set of floodlights at the rear of the house, shining from the second floor height, at the outermost corners of the house, to light the back yard. I was told to do away with the floodlights on the gable at the far end of the house and keep the other gable flood switched at the back door, but locate it instead at the forward most corner of the building to better light the driveway.
They further opted to make some changes to the switching system for the outside floodlighting. Since the 2nd floor master bedroom overlooked the back yard, they said that they wanted the ability to use the floods at the rear of the house from that second floor window, as well as keeping the switch at the french door, off the dining room. This requires a 3-Way switching system, allowing someone on the first floor to turn them on and then to turn them off again at that second floor window location. They reasoned that if the heard something in the yard, they could activate them and dispel their fear, and/or scare off an intruder.
As to the flood lighting on the gable, front corner, they wanted the ability to use this lighting from the front door and the back door, requiring another 3-Way switching system. They decided that they didn’t want the post lantern, as I had drawn in, so we scratched that switch from the front door location.
Weather-Proof Receptacles
Outside, we chose locations for the weather proof, GFCI receptacles, one on the rear deck, and the one required at the front of the house. These two plugs will be cut flush with the shingles and will be equipped with a weather resistant bubblecover. Just as it implies, a bubblecover is a large clear cover that, when closed, will protect a cord plugged into it from getting wet. They are also called in-use covers, since they keep the connection dry, even when a cord is in-use (read: plugged in).
The Living Room
So, After a small detour completely around the outside of the house and back again, we return to the interior, through the front door. We added a door bell button at the front door and they also wanted a button at the back door. The chimes themselves will be mounted in the downstairs hall, opposite the bathroom, usually at 6'-6" or so above the finished floor.
In the living room there is a ceiling fan, switched there at the front door, and there is also a set of 3-Way switches, one for the two duplex receptacles in the living room, along the front wall. The second 3-Way is for the array of recessed down the hallway to the back of the house, the third is now for that flood light, relocated to the front gable.
Smoke Detectors
Smoke detectors are now required for all new homes in being built across the nation. Although the smoke detector systems vary widely in complexity, as do, to a small degree, the basics for installation, there exist similarities among them all.
I cannot speak for all fire departments in all municipalities, to whom this responsibility is often left, or other regions, but, in parts of Massachusetts, the law is such:
A single family residence, must be protected by an approved smoke detection system, that operate on 120 volts and additionally must have back-up battery power and be electrically interconnected to each other in a manner that allows all detectors to alarm simultaneously. Smoke Detectors, installed on the ceiling, or in some cases on the wall, must be located throughout the house, in the following specific locations:
• Inside all bedrooms, sleeping lofts, etc.
• In hallways outside sleeping areas.
• At the top and the bottom of staircases.
• Not mentioned specifically, but in need of protection are rooms with cathedral ceilings; attic spaces accessible by stairs; full basements.
• Each detection device is designed to cover 1,200 square feet of living space, with additional detectors as needed to meet or surpass the minimum requirements.
• Detectors placed within 20 feet of a bathroom should be of the photoelectric type; others can be of the ionization variety.
Ionization detectors react to ionized particles; water, present in the form of steam, and would interfere thereby setting off false alarms. I usually install photoelectric smoke detectors exclusively since the high humidity region of Cape Cod can also set them off without reason. Everybody knows the crying wolf story, eh?
Carbon Monoxide Detectors
Carbon Monoxide (CO) Detectors are not presently required in dwellings, but they are increasingly being considered for inclusion in residential applications, especially in new buildings. Homes and other buildings are now being equipped with an insulation regimen second to none, and therefore new buildings are practically air tight. This feature, basically a building without air infiltration, can cause back ups in the exhaust system of any heating plant fueled by heating oil, propane or natural gas. The result is carbon monoxide infiltration into the home. Initially the Carbon Monoxide flows with the heated fumes of the boiler or furnace, usually to the ceiling level. Once the gas cools down it begins to accumulate at or near waist level in the home.
When installing these detectors, which can be connected in with your smoke detector system you can provide protection for your family from this very real household threat. Waist high is an accepted installation height.
To my readers trying to follow along, I can only apologize as I try desperately to assemble these installments in a manner that is easy to follow. This will eventually be a book for the home owner, or homebuilder, or whomever is interested.
posted by David @ 5:45 PM
![]()
![]()
0 Comments:
Post a Comment
<< Home